Agent App SDK
Introduction
Agent App Widgets are web applications loaded inside the LiveChat Agent App user interface. Read about their possible locations in the App locations guide. The Agent App SDK is currently the primary way to develop your own widgets and can be used in a basic or advanced way.
Use cases
Widgets are primary elements of the Agent App user interface. You can use them to:
- embed and display static content, for example, knowledge base articles, conversation prompts, or context information.
- embed your SaaS service or web app as part of the agents' workspace.
- query external services with visitor's email or LiveChat group ID (CRM, marketing automation, etc.).
- create a store with in-app purchases to sell additional services or features of your app.
- query LiveChat APIs to do basically anything with the visitor, agent, or chat.
Before you start
From a technical point of view, widgets are regular web applications. For that reason, you need to have some knowledge of HTML, CSS, and JavaScript to build your own widget.
Bear in mind that widgets are front-end elements of the LiveChat Agent App. If your intention is to build a server-side app, we encourage you to check out the Messaging APIs.
Getting started
Follow the intructions to create a basic LiveChat Widget. Before you start, make sure you have an account.
- Go to the Apps section in Developer Console.
- Click Create new app + and give your app a name.
- Decide which product you want to build your app for.
- Go to Building blocks and add a new LiveChat Widgets block.
- Enter the Widget source URL, which is the address of your application. If it's not ready yet, you can use our sample apps to play around.
- Choose the widget placement. It allows you to decide where exactly in the LiveChat App you want to display your integration. Currently, the possible locations are: the Details section, Message Box, App Settings, Fullscreen Apps (main menu). Read more about app locations.
- Additionally, you can configure your app's short decription and add an icon for better visibility in the LiveChat App. You can do that in the Display details tab.
- Go to the Private installation tab and install the app on your account.
After the successful installation, you'll see the widget in your LiveChat App.
Sample apps
If you'd like to experiment with some of the already existing apps, make sure to check out the repository we've prepared. Once installed, these widgets will be displayed in the right sidebar of the Agent App.
- Tag Master: allows user to create, view, and delete tags and canned responses in easy and predictable way.
- Progress: creates reports based on data from chats.
- Supervisor: helps to monitor the weekly progress of your agents, as well as their availability.
Installing the SDK
You can download the SDK directly from NPM as an ES6 or CommonJS module.
Install the SDK from NPM...
INSTALL THE SDK FORM NPMnpm install @livechat/agent-app-sdk
...then import the ES6 module...
IMPORT THE ES6 MODULEimport * as LiveChat from "@livechat/agent-app-sdk";
...or require the CommonJS.
REQUIRE THE COMMONJSconst LiveChat = require("@livechat/agent-app-sdk");
You can also use the UMD build of the SDK directly in the browser:
USE UMD BUILD<script src="https://unpkg.com/@livechat/agent-app-sdk@1.6.3/dist/agentapp.umd.min.js"></script>
<script>
LiveChat.createDetailsWidget().then(function(widget) {
// do something with widget
});
</script>
Basic use
The specific usage of the Agent App SDK depends on the type of widget you want to create. The currently available widget types are the following:
All widgets created with the Agent App SDK share a common interface, which lets you listen for the events happening in the Agent App.
Supposing that widget is a widget instance:
function handleEvent(event) {
  // perform logic when event happens,
  // you can also use the data attached to the event
}

// Subscribe to event
widget.on("event", handleEvent);

// Unsubscribe from event
widget.off("event", handleEvent);
Each widget type offers a different set of events that you can listen for.
Details widgets
If you want to use your app in the Details section, you should use the createDetailsWidget function. It returns a promise resolving to a details widget instance.
DETAILS WIDGETSimport { createDetailsWidget } from "@livechat/agent-app-sdk";
createDetailsWidget().then(widget => {
// build your logic around the widget
});
Events
customer_profile
Emitted when an agent opens a conversation within Chats or Archives, or when an agents selects the customer profile in the Customers sections. The handler will get the customer profile object as an argument.
Listen for the customer profile changes:
CUSTOMER_PROFILEwidget.on("customer_profile", profile => {
// read the new profile
});
The customer profile object will have the following shape:
| Property | Description |
|---|---|
id | Unique ID of a visitor |
name | Visitor name (if provided) |
email | Visitor email (if provided) |
chat | Object with three properties: chat_id (unique chat id), groupID (unique group id), and id (unique thread id); this object may be empty when a visitor is not currently chatting |
source | String representing the source of an event; possible values: chats, customers, archives |
geolocation | Object containing detailed information about customer's geolocation |
customVariables | Object containing custom variables for given customer/chat (if provided) |
customer_details_section_button_click
Emitted when you click a button located in a section in Customer Details. The handler gets the following payload:
| Property | Description |
|---|---|
buttonId | The id of the button taken from the section definition |
React to button clicks within Customer Details widgets
CUSTOMER_DETAILS_SECTION_BUTTON_CLICKwidget.on("customer_details_section_button_click", ({ buttonId }) => {
// perform an action when the button is clicked
});
Methods
Get the customer profile
If you want to access the current customer profile, you should use the getCustomerProfile method.
Get the current customer profile
GET THE CURRENT CUSTOMER PROFILEconst profile = widget.getCustomerProfile();
The returned profile will be an object identical to the one emitted by the customer_profile event. It can also be null if no profile was recorded.
Append text to the message box
You can add any text to the current chat message box by using the putMessage method. The method returns a promise.
Append text to the message box
APPEND TEXT TO THE MESSAGE BOXwidget.putMessage("this text will be appended").then(() => {
// the text should be appended now
});
Modify Customer Details widget's state
If you configured a Customer Details widget, you can modify its section state using the modifySection method. The method accepts the section state definition as its only parameter, and returns a promise.
You can look up the component types to see how to create the state definition.
The title of a given section has to match the one specified in the initial state. Otherwise, the section won't change. Also, the Agent App ignores the commands without valid section definitions. Make sure that the definition you're sending is correct.
Modify the Customer Details widget's state
MODIFY CUSTOMER DETAILS WIDGET STATEwidget
.modifySection({
title: "My widget",
components: [
{
type: "title",
data: {
value: "The title will be modified"
}
}
]
})
.then(() => {
// the widget should be modified now
});
MessageBox
The createMessageBoxWidget function creates a widget instance to be used in MessageBox.
MESSAGEBOXimport { createMessageBoxWidget } from ‘@livechat/agent-app-sdk’;
createMessageBoxWidget().then(widget => {
// do something with the widget
});
Methods
Set a message to be stored by MessageBox
SET A MESSAGE TO BE STORED BY MESSAGEBOXputMessage(msg: IRichMessage ): Promise<void>
Calling this method does not automatically send the message right away. The message is sent once an agent clicks the Send button. The message accepts the rich message type, which must implement the IRichMessage interface.
Set a message to be stored by MessageBox
SET A MESSAGE TO BE STORED BY MESSAGEBOXconst richMessage = {
template_id: "cards",
elements: [
{
title: "My cat photo",
image: {
url: "https://example.org/imgs/john-the-cat.jpg"
}
}
]
};
widget.putMessage(richMessage);
Rich Message object format
custom_id,propertiesandelementsare optionalelementsmay contain 1-10 element objects- all
elementsproperties are optional:title,subtitle,image, andbuttons - property
urlonimageis required - optional
imageproperties:name,content_type,size,width, andheight buttonsmay contain 1-11 button objects (1-13 if using API version 3.3 and above)template_iddescribes how the event should be presented in an appelements.buttons.postback_iddescribes the action sent via thesend_rich_message_postbackmethod- multiple buttons (even from different elements) can contain the same
postback_id; callingsend_rich_message_postbackwith this id will add a user to all these buttons at once. elements.buttons.user_idsdescribes users who sent the postback with"toggled": true
Fullscreen widgets
If you want to connect a Fullscreen widget to the LiveChat Agent App, you should use the createFullscreenWidget function. It returns a promise resolving to a Fullscreen widget instance.
FULLSCREEN WIDGETSimport { createFullscreenWidget } from "@livechat/agent-app-sdk";
createFullscreenWidget().then(widget => {
// build your logic around the widget
});
Events
page_data
Emitted when the widget is initialized. The handler will get the main window page data object as an argument.
Listen for the page data changes:
PAGE_DATAwidget.on("page_data", pageData => {
// read the page data
});
Methods
Set notification badge
If you want to notify Agents there’s something important inside the widget, use the setNotificationBadge method.
SET NOTIFICATION BADGEwidget.setNotificationBadge(26);
It displays a notification badge on top of your app’s icon:
If you want to remove the badge, invoke the method with the null parameter.
REMOVE NOTIFICATION BADGEwidget.setNotificationBadge(null);
Make sure Agents can dismiss the notification to avoid cluttered UI.
Navigate to pathname
Navigates LiveChat App to a given pathname.
NAVIGATE TO PATHNAMEwidget.navigate('/archives/?rate=rated_good');
Set Reports filters
Updates "Reports" section filters to a given filters object.
SET REPORTS FILTERSwidget.setReportsFilters({ tag: ['chatbot'] });
Get page data
Gets the most recently recorded main window page data and returns the IPageData object (identical to the one emitted by the page_data event). If no data was recorded, it returns null.
GET PAGE DATAwidget.getPageData();
Settings widgets
If you want to connect a Settings widget to the LiveChat App, you should use the createSettingsWidget function. It returns a promise resolving to a Settings widget instance.
SETTINGS WIDGETSimport { createSettingsWidget } from "@livechat/agent-app-sdk";
createSettingsWidget().then(widget => {
// build your logic around the widget
});
Events
page_data
Emitted when the widget is initialized. The handler will get the main window page data object as an argument.
Listen for the page data changes:
PAGE_DATAwidget.on("page_data", pageData => {
// read the page data
});
Methods
Get page data
Gets the most recently recorded main window page data and returns the IPageData object (identical to the one emitted by the page_data event). If no data was recorded, it returns null.
GET PAGE DATAwidget.getPageData();
Redirect
Redirects using the main window. Calling this method will send postMessage to the LiveChat App, which will be handled there. After that, a redirect using a window object is performed.
REDIRECTconst target = 'https://example.com';
widget.redirect(target);
Advanced use
Payments
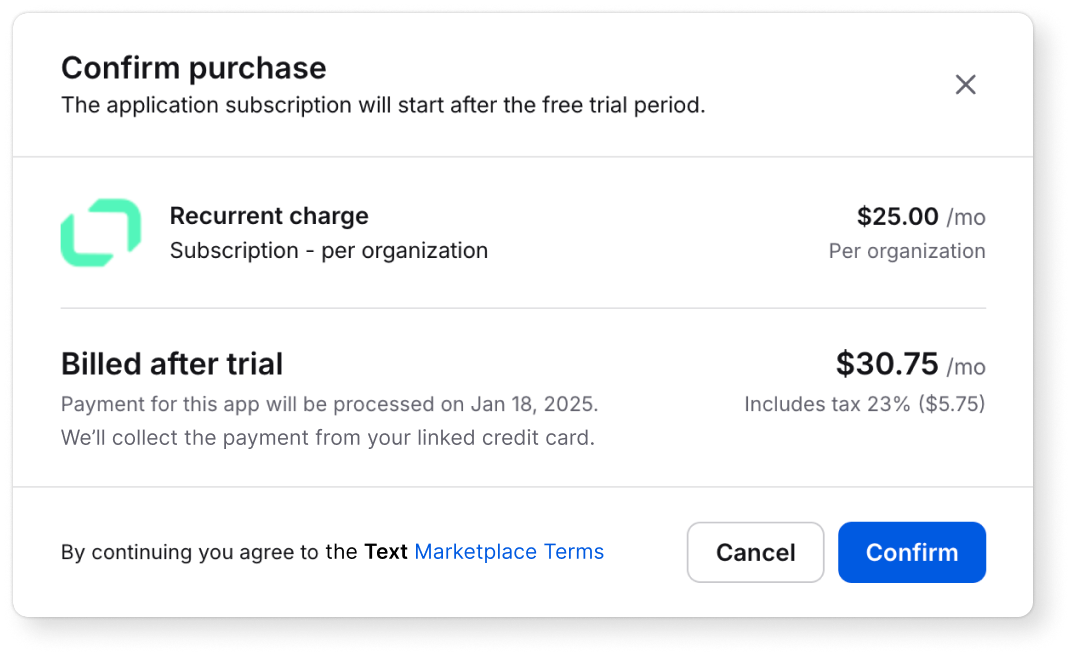
All widgets allow you to pass a registered charge and display its summary to the customer within the payment modal, directly in the LiveChat App. This flow enables customers to complete or decline the transaction without leaving the LiveChat App context.
Events
transaction_accepted
Emitted when a payment transaction is approved by the customer and successfully processed by the Billing API.
TRANSACTION_ACCEPTEDtype TransactionEvent {
chargeId: string;
}
transaction_declined
Emitted when a payment transaction is declined by the customer (e.g., the user closes the payment modal or clicks the cancel button), and the charge is subsequently marked as declined in the Billing API.
TRANSACTION_DECLINEDtype TransactionEvent {
chargeId: string;
}
transaction_failed
Emitted when a payment transaction fails and cannot be processed by the Billing API.
TRANSACTION_FAILEDtype TransactionError {
error: unknown;
}
update_billing_cycle
This event is triggered when a customer selects a different billing cycle for a transaction. It only emits if the showBillingCyclePicker flag is set to true in the metadata object at the start of the transaction. The event includes the new billing cycle number and key charge details, allowing you to register the updated charge with the provided information.
UPDATE_BILLING_CYCLEtype UpdateBillingCycleEvent {
billingCycle: number,
chargeId: string,
paymentIntent: {
name: string,
price: number,
per_account: boolean,
test: boolean,
return_url: string | null,
months?: number,
trial_days?: number,
quantity?: number,
metadata: {
type: string,
isExternalTransaction: boolean,
showBillingCyclePicker: boolean,
icon: string,
description?: string,
}
}
}
Methods
startTransaction(charge: Charge, metadata: Metadata): Promise<void>
This method allows you to pass a registered charge and accompanying metadata to the Agent App. The payment modal will then be displayed to the customer, enabling them to complete the transaction. For more information on registering a charge, refer to the Billing API.
const charge = {...} // Billing API charge object
const metadata = {
  icon: "https://icon.url";
  description: "This is a description of the transaction.";
  showBillingCyclePicker: true; // optional, use if you want to display the billing cycle picker to the customer
}

widget.startTransaction(charge, metadata);
You can follow this flow to create and monitor your in-app transactions:
- Create a charge: use the Billing API to create a new charge object.
- Initiate a transaction: call
startTransactionwith the registered charge and any metadata. This triggers a modal in the LiveChat App (or the parent object). - Monitor events: Set up listeners for transactions related events. You can listen to available app webhooks or built-in transaction events from the Agent App SDK.
Developing your own widget
If you're building your own widget and you need to interact with the Agent App, be sure to use the Agent App SDK.
Accessing LiveChat data
You can leverage the OAuth 2.1 authorization flow to use all of LiveChat APIs. Head to Sign in with LiveChat docs for more information.
Layout and Styling
If you're using React, you can use the LiveChat Design System, which is a component library used directly in the LiveChat user interface.
Hosting the widget
You can host your widget locally or on a dedicated server. The hosted content has to be served over the HTTPS Protocol.
During development, you can use a self-signed certificate for localhost or upload your widget to an SSL-enabled host. You can also leverage bundlers like Webpack to use an https-enabled development server.
If you need a quick way to deploy your widget, you can use Netlify Drop.
Creating a Customer Details widget
When developing an app in the Details section, you can add some content to the Customer Details view and display it as a widget. This way you turn it into a Customer Details widget.
Let's define the terms we use in this document:
- Section - an element of Customer Details. It contains a complete set of information grouped under a single widget.
- Component - a single line in a section. It can have one of the pre-defined formats and be filled with data from the app.
How to add a widget
To display a widget, first, you need to declare the initial state of a section. Go to Apps in Developer Console and create a new Details widget or update an exisiting one. The initial state of a section can be added using the Initial state input.
Example of the initial state JSON:
{
  "customerDetailsSections": [
    {
      "title": "Example section",
      "components": [
        {
          "type": "button",
          "data": {
            "label": "Example button",
            "id": "example-button"
          }
        }
      ]
    }
  ]
}
You can define as many sections as you want. Once your widget is running within the Agent App, you can't add nor remove any sections. However, you can still modify the components within any section.
Also, the title attribute in the section initial state acts as a section ID. You should not modify it.
How to update a section
You can control your widget and change its components using the Agent App SDK. Please refer to the Modify the Customer Details widget.
Component types
Here's the list of all the components you can use to build the Customer Details app.
Section
Section is a container for components.
Example of a section component
{
  "title": "card with image",
  "components": [],
  "imgUrl": "https://www.gstatic.com/webp/gallery/4.jpg",
  "openApp": true
}
| Property | Required | Type |
|---|---|---|
title | Yes | string |
components | Yes | array of components |
imgUrl | No | string |
openApp | No | boolean |
Title
Title could be used in several cases. Component look depends on the given data.
Example of a title component
{
  "type": "title",
  "data": {
    "title": "title",
    "value": "value",
    "description": "description",
    "imgUrl": "https://www.gstatic.com/webp/gallery/4.jpg"
  }
}
| Property | Required | Type | Note |
|---|---|---|---|
title | Yes | string | |
value | No | string | |
description | No | string | |
imgUrl | No | string | |
imgSize | No | Value: "small" or "big" (default) | |
link | No | string | URL added when the title is a link |
id | No | string | ID passed to the widget on click |
clickable | No | boolean | Adds a border and makes it clickable |
openApp | No | boolean | Opens widget on click |
Button
Simple button component
Example of a button component
{
  "type": "button",
  "data": {
    "id": "second-button",
    "label": "second button",
    "openApp": true,
    "primary": true
  }
}
| Property | Required | Type | Description |
|---|---|---|---|
id | Yes | string | |
label | Yes | string | |
openApp | No | boolean | Default value: false |
primary | No | boolean | Default value: false |
secondary | No | boolean | Default value: false |
Click events
You can listen for button clicks using the SDK. Note that buttonId will be the same as the id from the schema. If you want to capture a specific click, you need to make sure that the id is unique across all definitions.
Label with value
Example of label with value component
{
  "type": "label_value",
  "data": {
    "label": "Name",
    "value": "Stefan",
    "iconUrl": "https://www.gstatic.com/webp/gallery/4.jpg"
  }
}
| Property | Required | Type | Description |
|---|---|---|---|
label | No | string | |
value | No | string | |
iconUrl | No | string | |
url | No | string |
Link
Example of a link component
{
  "type": "link",
  "data": {
    "value": "click me",
    "url": "http://google.com",
    "inline": false
  }
}
| Property | Required | Type | Description |
|---|---|---|---|
url | Yes | string | |
value | No | string | |
inline | No | boolean | default: true |
Line
Line could be used to separate section content. It has no components inside.
Example of a line component
{
  "type": "line"
}
Customer
Renders a line with a customer's avatar, name, and email.
{
  "type": "customer"
}
Tags
Renders a list of tags with an optional label.
{
  "type": "tags",
  "data": {
    "tags": ["new", "important", "private"],
    "label": "Tags:"
  }
}
| Property | Required | Type |
|---|---|---|
tags | Yes | array of strings |
label | No | string |
Troubleshooting
There are errors in the console
Check out your browser's console to see if there are any of the errors listed below.
| Error | Explanation |
|---|---|
| Mixed Content: The page at 'https://my.livechatinc.com/' was loaded over HTTPS, but requested an insecure resource '...'. This request has been blocked; the content must be served over HTTPS. | For security reasons the Agent App is served over HTTPS and so must be the extension. Learn more on why we need SSL-enabled address in MDN article about mixed content. |
| Refused to display '...' in a frame because an ancestor violates the following Content Security Policy directive: "...". | The host that serves the plugin has specific Content Security Policy set up. |
| Refused to display '...' in a frame because it set 'X-Frame-Options' to 'SAMEORIGIN'. | The host serving the content of the plugin has specific X-Frame-Options header set up. |
Contact us
If you have any feature requests related to the App Widgets, let us know! We're open to your insights and suggestions. Feel free to drop us an email at developers@text.com or join our community on Discord and ask us your questions there.